
스프링으로 쇼핑몰을 만들어보자0 - 프로젝트 세팅
기능구현
- 회원가입(주소API연동, 이메일 인증, ajax를 사용하여 아이디 중복검사)
- 관리자 페이지(인터셉터 적용, 상품관리, 회원관리)
- 업로드(이미지 등록, 수정, 삭제)
- 검색
- 페이징
- 구매(장바구니, 포인트사용)
- 댓글(등록,수정,삭제)
- 중간에 막혔거나 에러 해결 못하겠으면 yoonbitnara@gmail.com 으로 문의
프로젝트 생성
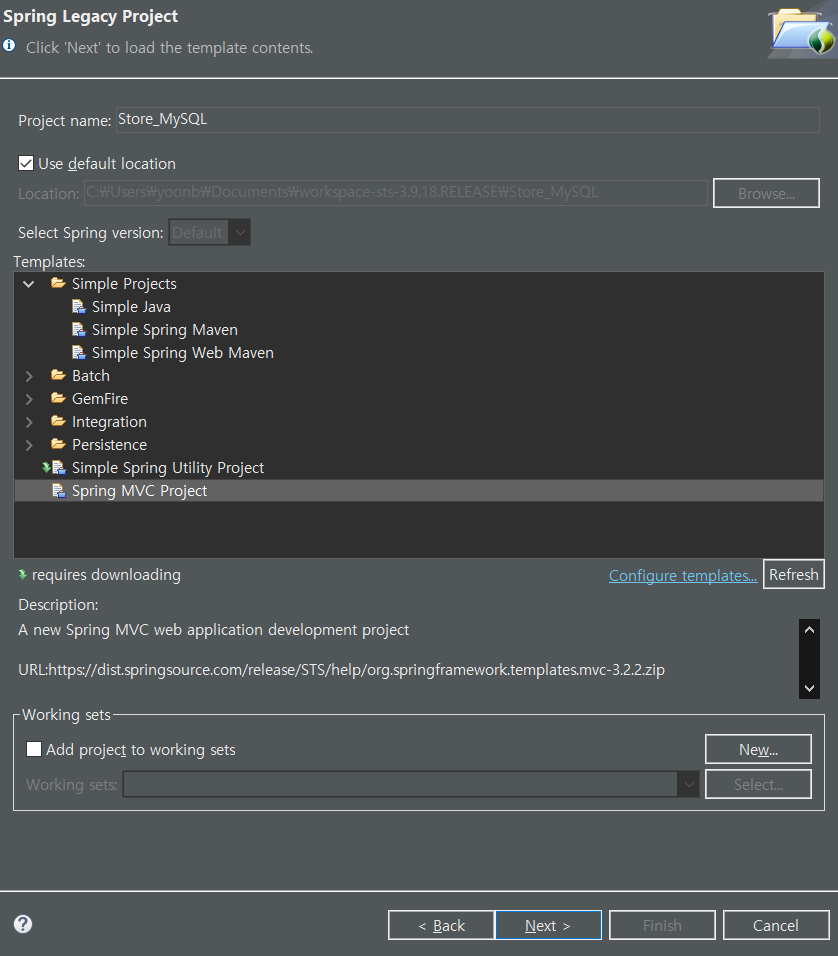 프로젝트명은
 Store_MySQL로 생성해준다. (다른이름으로 해도 상관없음)
테스트 및 로그 라이브러리 추가
- 경로
Store_MySQL\pom.xml
<?xml version="1.0" encoding="UTF-8"?>
<project xmlns="http://maven.apache.org/POM/4.0.0" xmlns:xsi="http://www.w3.org/2001/XMLSchema-instance"
	xsi:schemaLocation="http://maven.apache.org/POM/4.0.0 https://maven.apache.org/maven-v4_0_0.xsd">
	<modelVersion>4.0.0</modelVersion>
	<groupId>com.store</groupId>
	<artifactId>controller</artifactId>
	<name>Store_MySQL</name>
	<packaging>war</packaging>
	<version>1.0.0-BUILD-SNAPSHOT</version>
	<properties>
		<java-version>1.8</java-version>
		<org.springframework-version>3.1.1.RELEASE</org.springframework-version>
		<org.aspectj-version>1.6.10</org.aspectj-version>
		<org.slf4j-version>1.6.6</org.slf4j-version>
	</properties>
	<dependencies>
		<!-- Spring -->
		<dependency>
			<groupId>org.springframework</groupId>
			<artifactId>spring-context</artifactId>
			<version>${org.springframework-version}</version>
			<exclusions>
				<!-- Exclude Commons Logging in favor of SLF4j -->
				<exclusion>
					<groupId>commons-logging</groupId>
					<artifactId>commons-logging</artifactId>
				 </exclusion>
			</exclusions>
		</dependency>
		<dependency>
			<groupId>org.springframework</groupId>
			<artifactId>spring-webmvc</artifactId>
			<version>${org.springframework-version}</version>
		</dependency>

		<!-- AspectJ -->
		<dependency>
			<groupId>org.aspectj</groupId>
			<artifactId>aspectjrt</artifactId>
			<version>${org.aspectj-version}</version>
		</dependency>

		<!-- Logging -->
		<dependency>
			<groupId>org.slf4j</groupId>
			<artifactId>slf4j-api</artifactId>
			<version>${org.slf4j-version}</version>
		</dependency>
		<dependency>
			<groupId>org.slf4j</groupId>
			<artifactId>jcl-over-slf4j</artifactId>
			<version>${org.slf4j-version}</version>
			<scope>runtime</scope>
		</dependency>
		<dependency>
			<groupId>org.slf4j</groupId>
			<artifactId>slf4j-log4j12</artifactId>
			<version>${org.slf4j-version}</version>
			<scope>runtime</scope>
		</dependency>
		<!-- <dependency>
			<groupId>log4j</groupId>
			<artifactId>log4j</artifactId>
			<version>1.2.15</version>
			<exclusions>
				<exclusion>
					<groupId>javax.mail</groupId>
					<artifactId>mail</artifactId>
				</exclusion>
				<exclusion>
					<groupId>javax.jms</groupId>
					<artifactId>jms</artifactId>
				</exclusion>
				<exclusion>
					<groupId>com.sun.jdmk</groupId>
					<artifactId>jmxtools</artifactId>
				</exclusion>
				<exclusion>
					<groupId>com.sun.jmx</groupId>
					<artifactId>jmxri</artifactId>
				</exclusion>
			</exclusions>
			<scope>runtime</scope>
		</dependency> -->

		<dependency>
    		<groupId>org.projectlombok</groupId>
    		<artifactId>lombok</artifactId>
    		<version>1.16.16</version>
    		<scope>provided</scope>
		</dependency>

		<!-- log4j추가 -->
		<dependency>
			<groupId>log4j</groupId>
			<artifactId>log4j</artifactId>
			<version>1.2.17</version>
		</dependency>

		<!-- spring test 추가-->
		<dependency>
			<groupId>org.springframework</groupId>
			<artifactId>spring-test</artifactId>
			<version>${org.springframework-version}</version>
			<scope>test</scope>
		</dependency>
		<!-- @Inject -->
		<dependency>
			<groupId>javax.inject</groupId>
			<artifactId>javax.inject</artifactId>
			<version>1</version>
		</dependency>

		<!-- Servlet -->
		<dependency>
			<groupId>javax.servlet</groupId>
			<artifactId>servlet-api</artifactId>
			<version>2.5</version>
			<scope>provided</scope>
		</dependency>
		<dependency>
			<groupId>javax.servlet.jsp</groupId>
			<artifactId>jsp-api</artifactId>
			<version>2.1</version>
			<scope>provided</scope>
		</dependency>
		<dependency>
			<groupId>javax.servlet</groupId>
			<artifactId>jstl</artifactId>
			<version>1.2</version>
		</dependency>

		<!-- Test -->
		<dependency>
			<groupId>junit</groupId>
			<artifactId>junit</artifactId>
			<version>4.12</version>
			<scope>test</scope>
		</dependency>
	</dependencies>
    <build>
        <plugins>
            <plugin>
                <artifactId>maven-eclipse-plugin</artifactId>
                <version>2.9</version>
                <configuration>
                    <additionalProjectnatures>
                        <projectnature>org.springframework.ide.eclipse.core.springnature</projectnature>
                    </additionalProjectnatures>
                    <additionalBuildcommands>
                        <buildcommand>org.springframework.ide.eclipse.core.springbuilder</buildcommand>
                    </additionalBuildcommands>
                    <downloadSources>true</downloadSources>
                    <downloadJavadocs>true</downloadJavadocs>
                </configuration>
            </plugin>
            <plugin>
                <groupId>org.apache.maven.plugins</groupId>
                <artifactId>maven-compiler-plugin</artifactId>
                <version>2.5.1</version>
                <configuration>
                    <source>1.6</source>
                    <target>1.6</target>
                    <compilerArgument>-Xlint:all</compilerArgument>
                    <showWarnings>true</showWarnings>
                    <showDeprecation>true</showDeprecation>
                </configuration>
            </plugin>
            <plugin>
                <groupId>org.codehaus.mojo</groupId>
                <artifactId>exec-maven-plugin</artifactId>
                <version>1.2.1</version>
                <configuration>
                    <mainClass>org.test.int1.Main</mainClass>
                </configuration>
            </plugin>
        </plugins>
    </build>
</project>
예제 객체 생성 및 의존성 주입
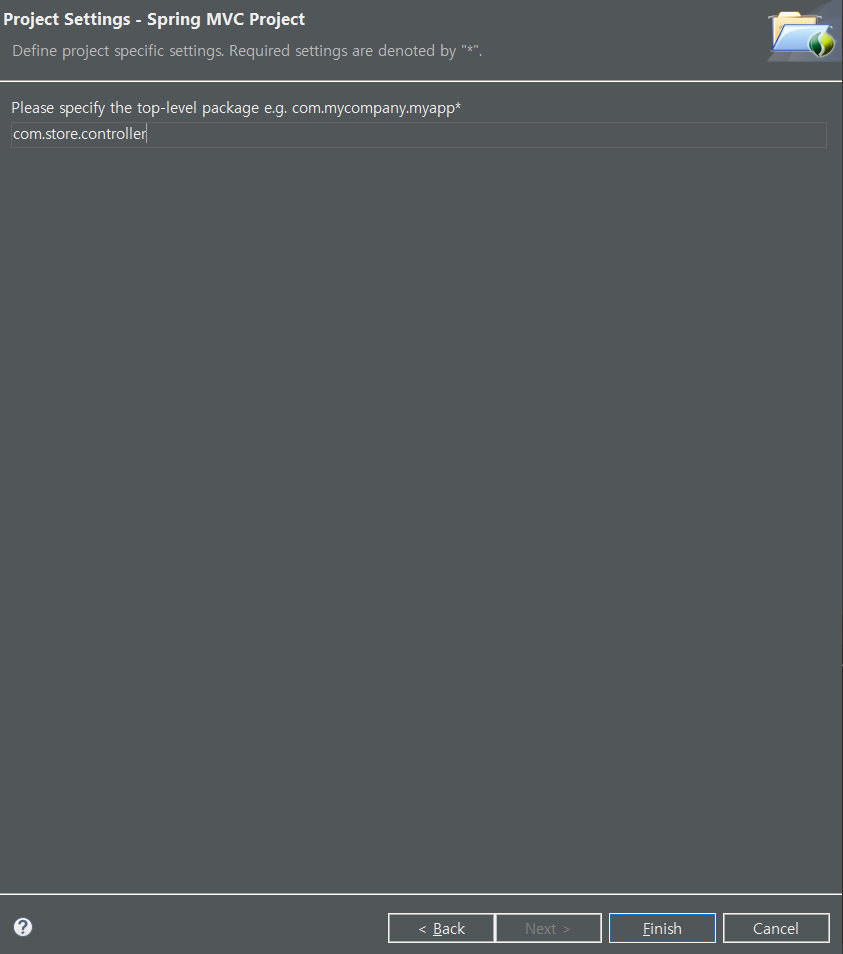
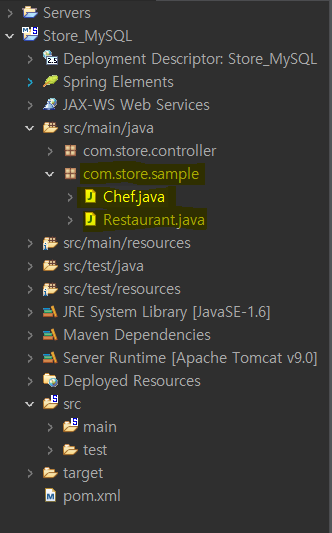
src/main/java경로에com.프로젝트명.sample패키지를 생성해준다.(단순 테스트라 기존에 있던 패키지를 사용하여도 상관없다.)- 생성된 패키지에
Restaurant.java,Chef.java클래스를 생성한다.
Restaurant.java
package com.store.sample;

import org.springframework.beans.factory.annotation.*;

import org.springframework.stereotype.Component;

import lombok.Data;

@Component
@Data
public class Restaurant {

	@Autowired
	private Chef chef;

}
Chef.java
package com.store.sample;

import org.springframework.stereotype.Component;

import lombok.Data;

@Component
@Data
public class Chef {

}
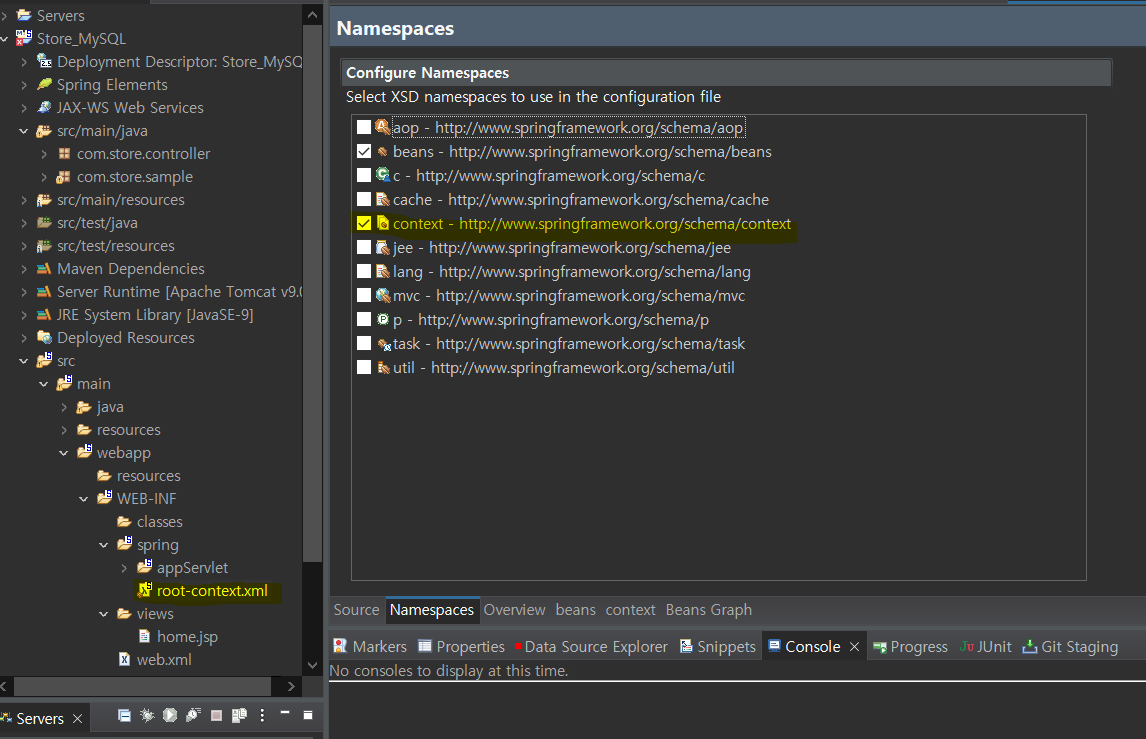
root-context.xml에 들어가서 하단NameSpaces클릭 후context항목을 체크 후source탭 클릭
<?xml version="1.0" encoding="UTF-8"?>
<beans xmlns="http://www.springframework.org/schema/beans"
	xmlns:xsi="http://www.w3.org/2001/XMLSchema-instance"
	xmlns:context="http://www.springframework.org/schema/context"
	xsi:schemaLocation="http://www.springframework.org/schema/beans https://www.springframework.org/schema/beans/spring-beans.xsd
		http://www.springframework.org/schema/context http://www.springframework.org/schema/context/spring-context-3.1.xsd">

	<!-- Root Context: defines shared resources visible to all other web components -->
	<context:component-scan base-package="com.store.sample"></context:component-scan>

</beans>
<context:component-scan base-package="패키지경로">코드를 추가 후 저장한다.
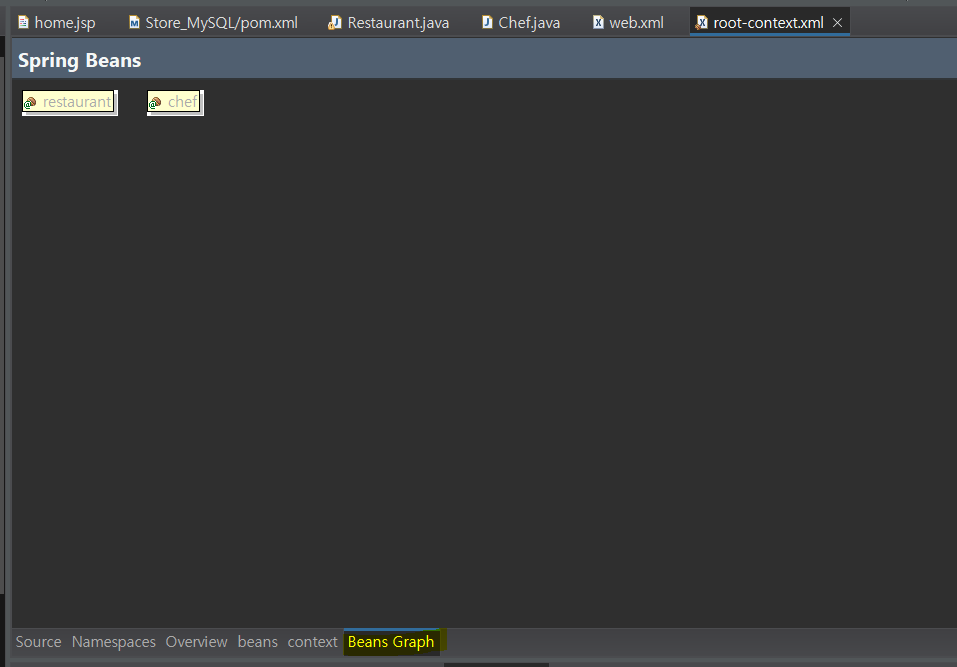
아래의 탭들 중 Beans Graph탭을 클릭하면 Chef.java클래스와 Restaurant.java클래스가 스프링에서 관리해야할 객체로 인식 하고 있다.
MySQL 연결
- MySQL은 공식적으로 Maven을 지원한다.
pom.xml에<dependency></dependency>태그를 추가하여 설치한다. -
자신에게 맞는 버전을
pom.xml에 추가해준다. pom.xml<dependency> <groupId>mysql</groupId> <artifactId>mysql-connector-java</artifactId> <version>8.0.26</version> </dependency>
src/test/java경로에 com.프로젝트명.persistence 패키지 생성 후 JDBCTest.java클래스를 생성한다.
JDBCTest.java
package com.store.persistence;

import static org.junit.Assert.fail;

import java.sql.Connection;
import java.sql.DriverManager;

import org.junit.Test;

public class JDBCTest {

	static {
		try {
			Class.forName("com.mysql.cj.jdbc.Driver");
		} catch(Exception e) {
			e.printStackTrace();
		}
	}

	@Test
	public void testConnection() {

		try(Connection con =
				DriverManager.getConnection(
						"jdbc:mysql://localhost:3306/데이터베이스명?serverTimezone=Asia/Seoul",
						"데이터베이스 사용자명",
						"비밀번호")){
			System.out.println(con);
		} catch (Exception e) {
			fail(e.getMessage());
		}

	}

}
해당 클래스 우클릭 Run As > Junit Test 실행
console에 별다른 에러 메세지가 없이
com.mysql.cj.jdbc.ConnectionImpl@c667f46
이런식으로 나온다면 정상이다.
커넥션 풀 설정(HikariCP)
<!-- https://mvnrepository.com/artifact/com.zaxxer/HikariCP -->
		<dependency>
		    <groupId>com.zaxxer</groupId>
		    <artifactId>HikariCP</artifactId>
		    <version>3.4.2</version>
		</dependency>
pom.xml추가
DataSource 설정
root-context.xml에 들어간다.Source탭 클릭
<?xml version="1.0" encoding="UTF-8"?>
<beans xmlns="http://www.springframework.org/schema/beans"
	xmlns:xsi="http://www.w3.org/2001/XMLSchema-instance"
	xmlns:context="http://www.springframework.org/schema/context"
	xsi:schemaLocation="http://www.springframework.org/schema/beans https://www.springframework.org/schema/beans/spring-beans.xsd
		http://www.springframework.org/schema/context http://www.springframework.org/schema/context/spring-context-3.1.xsd">

	<!-- Root Context: defines shared resources visible to all other web components -->

	<bean id="hikariConfig" class="com.zaxxer.hikari.HikariConfig">
 		<property name="driverClassName" value="com.mysql.cj.jdbc.Driver"></property>
		<property name="jdbcUrl" value="jdbc:mysql://localhost:3306/데이터베이스명?serverTimezone=Asia/Seoul"></property>
		<property name="username" value="사용자명"></property>
		<property name="password" value="비밀번호"></property>
	</bean>

	<bean id="datasource" class="com.zaxxer.hikari.HikariDataSource" destroy-method="close">
		<constructor-arg ref="hikariConfig"></constructor-arg>
	</bean>
	<context:component-scan base-package="com.store.sample"></context:component-scan>

</beans>
Test
Bean으로 등록된DataSource를 이용하여Connection을 제대로 할 수 있는지 확인해야 한다.src/test/java경로에 좀전에 만들어 둔com.프로젝트명.persistence패키지에DataSourceTest.java클래스를 생성한다.
DataSourceTest.java
package com.store.persistence;

import java.sql.Connection;

import javax.sql.DataSource;

import org.junit.Test;
import org.junit.runner.RunWith;
import org.springframework.beans.factory.annotation.Autowired;
import org.springframework.test.context.ContextConfiguration;
import org.springframework.test.context.junit4.SpringJUnit4ClassRunner;

@RunWith(SpringJUnit4ClassRunner.class)
@ContextConfiguration("file:src/main/webapp/WEB-INF/spring/root-context.xml")
public class DataSourceTest {

	@Autowired
	private DataSource dataSource;

	@Test
	public void testConnection() {

		try (
			Connection con = dataSource.getConnection();
			){
			System.out.println("con = " + con);
		} catch (Exception e) {
			e.printStackTrace();
		}
	}

}
Junit Test를 진행한다.
결과
INFO : org.springframework.test.context.support.DefaultTestContextBootstrapper - Loaded default TestExecutionListener class names from location [META-INF/spring.factories]: [org.springframework.test.context.web.ServletTestExecutionListener, org.springframework.test.context.support.DirtiesContextBeforeModesTestExecutionListener, org.springframework.test.context.support.DependencyInjectionTestExecutionListener, org.springframework.test.context.support.DirtiesContextTestExecutionListener, org.springframework.test.context.transaction.TransactionalTestExecutionListener, org.springframework.test.context.jdbc.SqlScriptsTestExecutionListener]
INFO : org.springframework.test.context.support.DefaultTestContextBootstrapper - Using TestExecutionListeners: [org.springframework.test.context.web.ServletTestExecutionListener@1ff4931d, org.springframework.test.context.support.DirtiesContextBeforeModesTestExecutionListener@65e98b1c, org.springframework.test.context.support.DependencyInjectionTestExecutionListener@61322f9d, org.springframework.test.context.support.DirtiesContextTestExecutionListener@6ad82709]
INFO : org.springframework.beans.factory.xml.XmlBeanDefinitionReader - Loading XML bean definitions from URL [file:src/main/webapp/WEB-INF/spring/root-context.xml]
INFO : org.springframework.context.support.GenericApplicationContext - Refreshing org.springframework.context.support.GenericApplicationContext@11c9af63: startup date [Tue May 17 23:15:36 KST 2022]; root of context hierarchy
INFO : org.springframework.beans.factory.annotation.AutowiredAnnotationBeanPostProcessor - JSR-330 'javax.inject.Inject' annotation found and supported for autowiring
INFO : com.zaxxer.hikari.HikariDataSource - HikariPool-1 - Starting...
INFO : com.zaxxer.hikari.HikariDataSource - HikariPool-1 - Start completed.
con = HikariProxyConnection@351970188 wrapping com.mysql.cj.jdbc.ConnectionImpl@7ff2b8d2
INFO : org.springframework.context.support.GenericApplicationContext - Closing org.springframework.context.support.GenericApplicationContext@11c9af63: startup date [Tue May 17 23:15:36 KST 2022]; root of context hierarchy
INFO : com.zaxxer.hikari.HikariDataSource - HikariPool-1 - Shutdown initiated...
INFO : com.zaxxer.hikari.HikariDataSource - HikariPool-1 - Shutdown completed.
My Batis 추가
- My Batis를 사용하기 위해서는 mybatis / mybatis-spring / spring-jdbc / spring-tx 총 4개가 필요하다.
- spring-jdbc와 spring-tx는 스프링에서 데이터베이스 처리와 트랜잭션 처리를 하는 라이브러리다.
- 아래의 내용을
pom.xml에 추가해준다.
<!-- https://mvnrepository.com/artifact/org.mybatis/mybatis -->
		<dependency>
		    <groupId>org.mybatis</groupId>
		    <artifactId>mybatis</artifactId>
		    <version>3.5.3</version>
		</dependency>
		<!-- https://mvnrepository.com/artifact/org.mybatis/mybatis-spring -->
		<dependency>
		    <groupId>org.mybatis</groupId>
		    <artifactId>mybatis-spring</artifactId>
		    <version>2.0.3</version>
		</dependency>
		<!-- https://mvnrepository.com/artifact/org.springframework/spring-tx -->
		<dependency>
		    <groupId>org.springframework</groupId>
		    <artifactId>spring-tx</artifactId>
		    <version>${org.springframework-version}</version>
		</dependency>
		<!-- https://mvnrepository.com/artifact/org.springframework/spring-jdbc -->
		<dependency>
		    <groupId>org.springframework</groupId>
		    <artifactId>spring-jdbc</artifactId>
		    <version>${org.springframework-version}</version>
		</dependency>
SQLSessionFactory 설정
- MyBatis에서 가장 핵심적인 객체는 SQLSession이다. SQLSession객체는 Connection을 생성하거나 원하는 SQL을 전달하고 결과를 리턴 받도록 해준다. 이 SQLSession을 만들어 내는 객체가 SQLSessionFactory이다.
- 아래의 코드를 root-context.xml에 추가한다.
<bean id="sqlSessionFactory" class="org.mybatis.spring.SqlSessionFactoryBean">
		<property name="dataSource" ref="datasource"></property>
	</bean>
Test
- 기존
DataSourceTest.java클래스에 테스트 할 코드를 추가한다. - SQLSessionFactory 객체를 주입시킨다.
- try문에 SQLSession 객체를 인스턴스화 하는 코드와 출력문 코드를 추가한다.
package com.store.persistence;

import java.sql.Connection;

import javax.sql.DataSource;

import org.apache.ibatis.session.SqlSession;
import org.apache.ibatis.session.SqlSessionFactory;
import org.junit.Test;
import org.junit.runner.RunWith;
import org.springframework.beans.factory.annotation.Autowired;
import org.springframework.test.context.ContextConfiguration;
import org.springframework.test.context.junit4.SpringJUnit4ClassRunner;

@RunWith(SpringJUnit4ClassRunner.class)
@ContextConfiguration("file:src/main/webapp/WEB-INF/spring/root-context.xml")
public class DataSourceTest {

	@Autowired
	private DataSource dataSource;

	@Autowired
	private SqlSessionFactory sqlSessionFactory;

	@Test
	public void testConnection() {

		try (
				Connection con = dataSource.getConnection();
				SqlSession session = sqlSessionFactory.openSession();
			){
			System.out.println("con = " + con);
			System.out.println("session = " + session);
		} catch (Exception e) {
			e.printStackTrace();
		}
	}

}
결과
INFO : org.springframework.test.context.support.DefaultTestContextBootstrapper - Loaded default TestExecutionListener class names from location [META-INF/spring.factories]: [org.springframework.test.context.web.ServletTestExecutionListener, org.springframework.test.context.support.DirtiesContextBeforeModesTestExecutionListener, org.springframework.test.context.support.DependencyInjectionTestExecutionListener, org.springframework.test.context.support.DirtiesContextTestExecutionListener, org.springframework.test.context.transaction.TransactionalTestExecutionListener, org.springframework.test.context.jdbc.SqlScriptsTestExecutionListener]
INFO : org.springframework.test.context.support.DefaultTestContextBootstrapper - Using TestExecutionListeners: [org.springframework.test.context.web.ServletTestExecutionListener@305b7c14, org.springframework.test.context.support.DirtiesContextBeforeModesTestExecutionListener@6913c1fb, org.springframework.test.context.support.DependencyInjectionTestExecutionListener@66d18979, org.springframework.test.context.support.DirtiesContextTestExecutionListener@bccb269, org.springframework.test.context.transaction.TransactionalTestExecutionListener@609cd4d8, org.springframework.test.context.jdbc.SqlScriptsTestExecutionListener@17f7cd29]
INFO : org.springframework.beans.factory.xml.XmlBeanDefinitionReader - Loading XML bean definitions from URL [file:src/main/webapp/WEB-INF/spring/root-context.xml]
INFO : org.springframework.context.support.GenericApplicationContext - Refreshing org.springframework.context.support.GenericApplicationContext@524d6d96: startup date [Tue May 17 23:27:50 KST 2022]; root of context hierarchy
INFO : org.springframework.beans.factory.annotation.AutowiredAnnotationBeanPostProcessor - JSR-330 'javax.inject.Inject' annotation found and supported for autowiring
INFO : com.zaxxer.hikari.HikariDataSource - HikariPool-1 - Starting...
INFO : com.zaxxer.hikari.HikariDataSource - HikariPool-1 - Start completed.
con = HikariProxyConnection@1677921169 wrapping com.mysql.cj.jdbc.ConnectionImpl@2032e725
session = org.apache.ibatis.session.defaults.DefaultSqlSession@4d23015c
INFO : org.springframework.context.support.GenericApplicationContext - Closing org.springframework.context.support.GenericApplicationContext@524d6d96: startup date [Tue May 17 23:27:50 KST 2022]; root of context hierarchy
INFO : com.zaxxer.hikari.HikariDataSource - HikariPool-1 - Shutdown initiated...
INFO : com.zaxxer.hikari.HikariDataSource - HikariPool-1 - Shutdown completed.
Log4jdbc-log4je 추가
- Log4jdbc는 스프링에서 SQL문을 실행한 로그를 효과적이고 직관적으로 볼 수 있도록 해주는 라이브러리다.
- 테이블이 많은 정보를 가질수록 가독성에 큰 차이가 있다.
- 아래의 코드를
pom.xml에 추가해준다.
<!-- https://mvnrepository.com/artifact/org.bgee.log4jdbc-log4j2/log4jdbc-log4j2-jdbc4 -->
<dependency>
    <groupId>org.bgee.log4jdbc-log4j2</groupId>
    <artifactId>log4jdbc-log4j2-jdbc4</artifactId>
    <version>1.16</version>
</dependency>
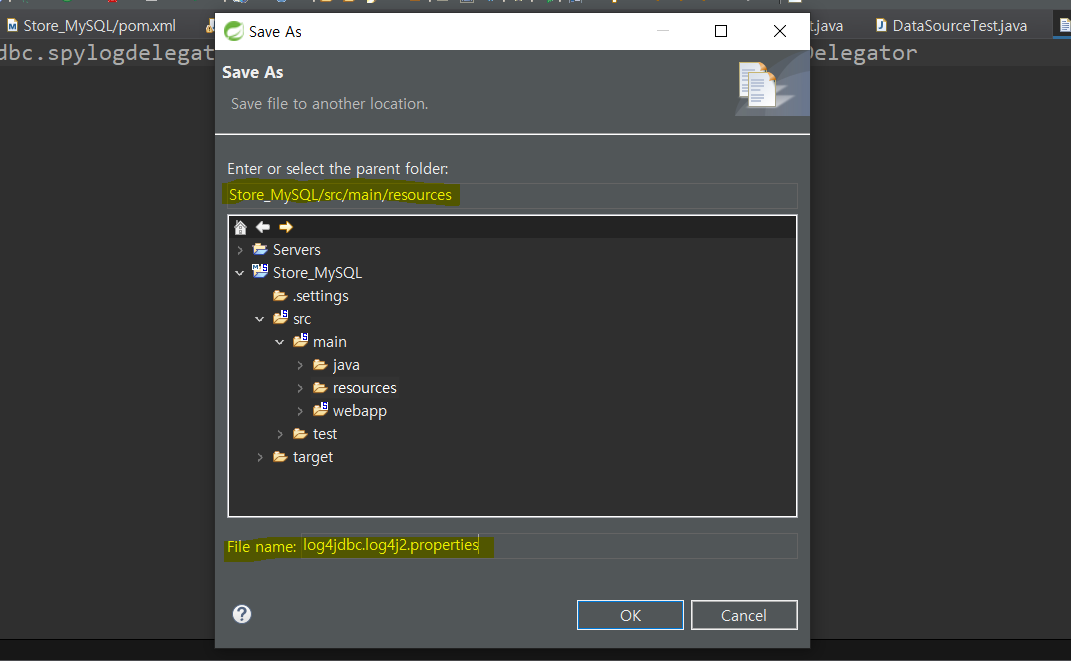
- properties 생성
- 상단 메뉴 중 File > New > Other 클릭
- General 선택 > Untitled Text File 선택 후 Finish
log4jdbc.spylogdelegator.name=net.sf.log4jdbc.log.slf4j.Slf4jSpyLogDelegator- 위 코드를 방금 생성한 파일에 추가 후 저장해준다.
root-context.xml의 Source에 기존에 있던 mysql 코드를 바꿔준다.
	<bean id="hikariConfig" class="com.zaxxer.hikari.HikariConfig">
 		<!--<property name="driverClassName" value="com.mysql.jdbc.Driver"></property>
		<property name="jdbcUrl" value="jdbc:mysql://localhost:3306/데이터베이스명?serverTimezone=Asia/Seoul"></property> -->

		<property name="driverClassName" value="net.sf.log4jdbc.sql.jdbcapi.DriverSpy"></property>
		<property name="jdbcUrl" value="jdbc:log4jdbc:mysql://localhost:3306/데이터베이스명?serverTimezone=Asia/Seoul"></property>
		<property name="username" value="사용자이름"></property>
		<property name="password" value="비밀번호"></property>
	</bean>
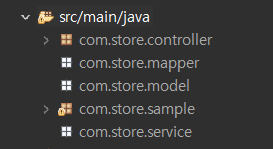
패키지 추가 및 설정
com.프로젝트명.model- VO패키지다. 데이터 타입을 저장한다.
com.프로젝트명.mapper- DAO역할을 하는 패키지다. 데이터베이스에 접속하는 역할을 한다.
com.프로젝트명.service- Service패키지다. mapper와 Controller 사이를 연결해준다.
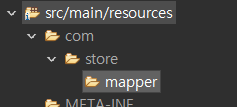
Mapper XML 저장 위치 폴더 생성
- src/main/resources 위치에 mapper 패키지명을 폴더 경로로 만들어준다.
- 해당 경로에 mapper로 사용할 xml 파일을 저장시킨다.
- 생성한 패키지가 스프링에서 인식이 되도록
root-context.xml파일을 수정한다. - mapper 패키지는 MyBatis가 인식할 수 있도록
<mybatis-spring:scan>태그를 추가해준다. - model, service 패키지는 스프링이 인식할 수 있도록
<context:component-scan>태그를 추가해준다.
	<mybatis-spring:scan base-package="com.store.mapper"/>
	<context:component-scan base-package="com.store.model"/>
	<context:component-scan base-package="com.store.service"/>
Servlet 버전변경
- servlet 3.0 이상 버전을 추천한다.
pom.xml에서 기존 servlet 2.5 버전을 삭제 후 3.1.0버전을 추가한다.
		<!-- Servlet -->
		<!-- <dependency>
			<groupId>javax.servlet</groupId>
			<artifactId>servlet-api</artifactId>
			<version>2.5</version>
			<scope>provided</scope>
		</dependency> -->
		<!-- https://mvnrepository.com/artifact/javax.servlet/javax.servlet-api -->
		<dependency>
		    <groupId>javax.servlet</groupId>
		    <artifactId>javax.servlet-api</artifactId>
		    <version>3.1.0</version>
		    <scope>provided</scope>
		</dependency>
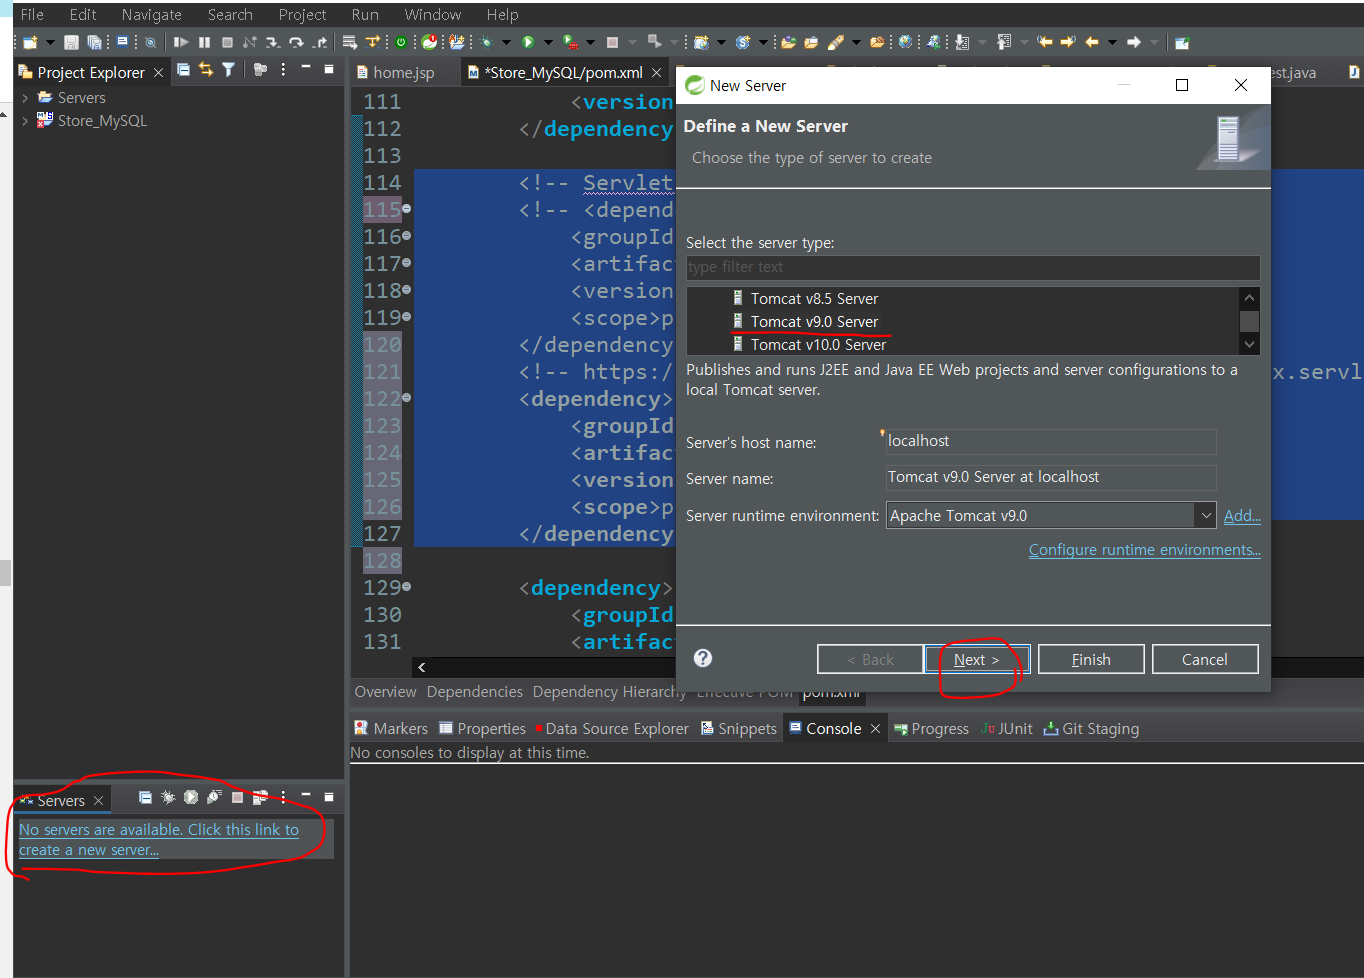
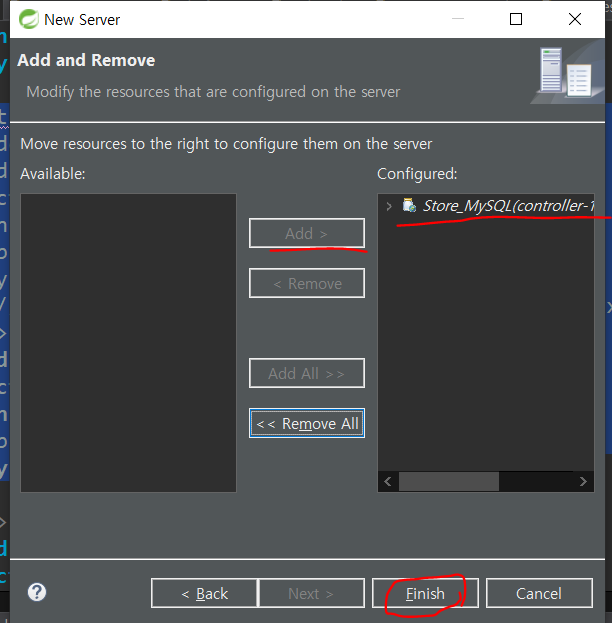
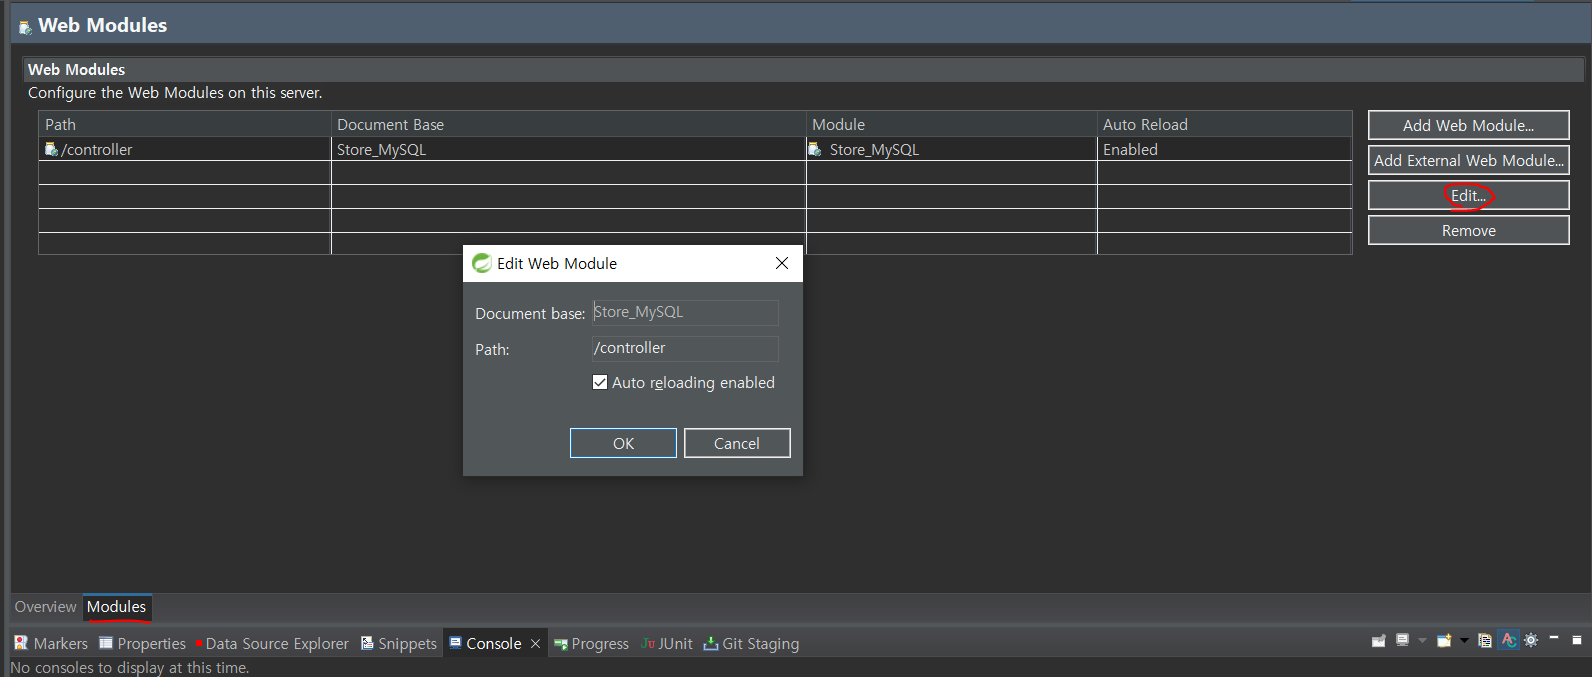
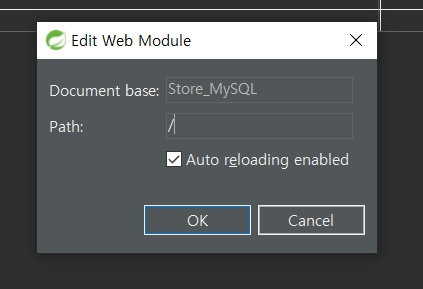
프로젝트가 절대경로를 이용하도록 변경
- 서버추가

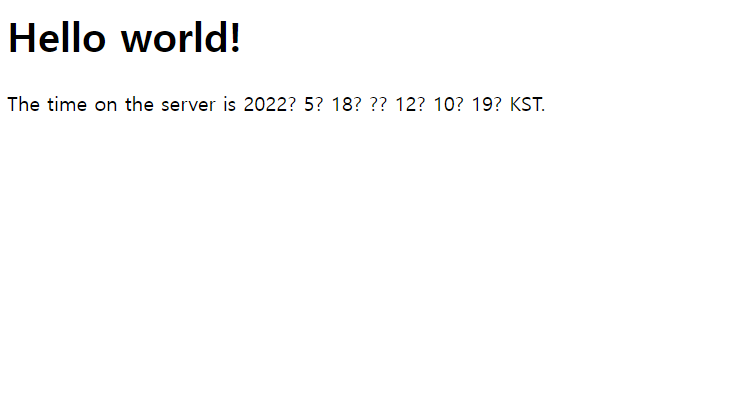
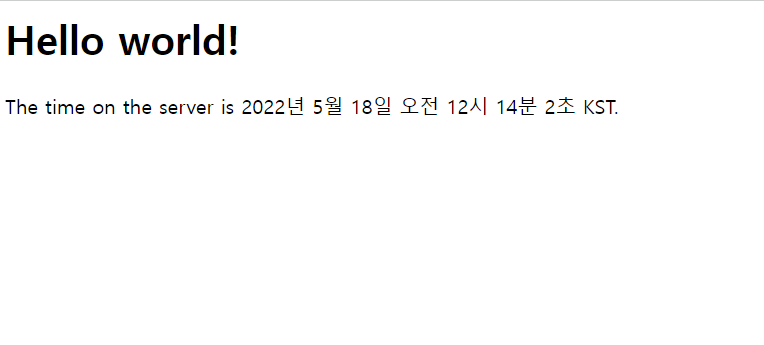
한글깨짐방지
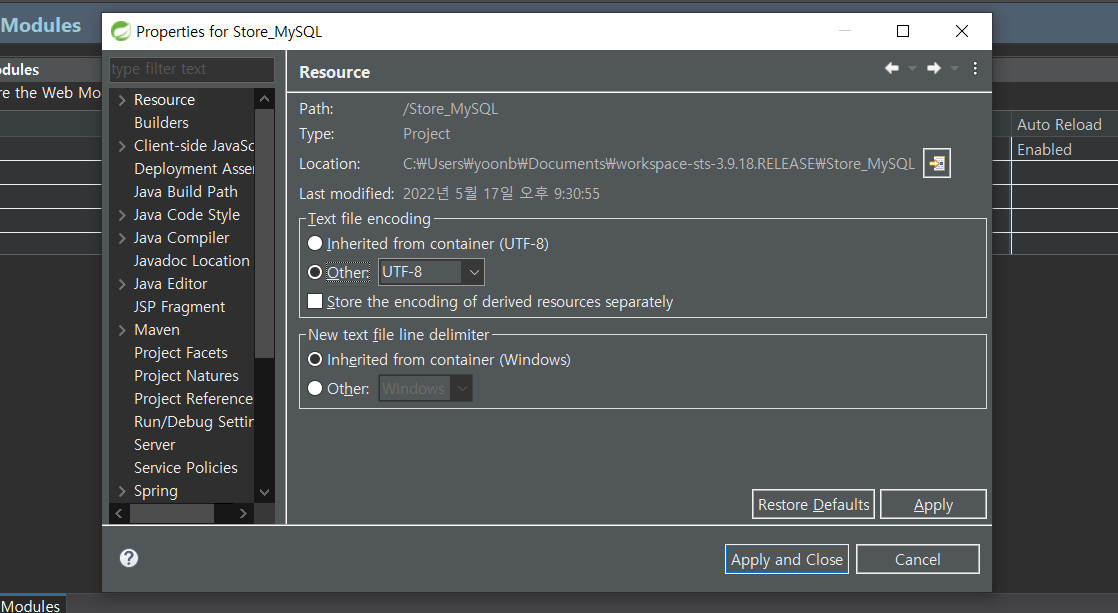
- 프로젝트 우클릭 > properties 클릭 > Resource탭 클릭
- “src -> main -> webapp -> WEB-INF” 경로에 있는 web.xml에 아래의 코드를 추가한다.
<filter>
        <filter-name>encodingFilter</filter-name>
        <filter-class>
            org.springframework.web.filter.CharacterEncodingFilter
        </filter-class>
        <init-param>
            <param-name>encoding</param-name>
            <param-value>UTF-8</param-value>
        </init-param>
        <init-param>
            <param-name>forceEncoding</param-name>
            <param-value>true</param-value>
        </init-param>
    </filter>
    <filter-mapping>
        <filter-name>encodingFilter</filter-name>
        <url-pattern>/*</url-pattern>
    </filter-mapping>
- 서버재시작
Leave a comment